
ben's room | designing a photo wall

When I found out I was pregnant with another boy, I knew I'd keep our nursery basically the same. This meant pulling everything out of our guest room (there wasn't much in there to begin with), and starting from scratch on a "big boy room" for Ben.
Normally I love tackling a project like this, but that empty room was so daunting. We used the same vintage dresser in the room (maybe we'll get around to refinishing it someday), but we needed some kind of seating for reading and hanging out.
We bought this love seat from Ikea. It kind of folds out into a bed that a little kid could sleep on (basically a cushion on the floor) and it's dark grey. Perfect. The wall above the couch screamed for either some major artwork or a collage.
Design-wise, I really had no specific plan for the room, so I started by picking a color scheme: grey and white with pops of orange.

I gathered things from around the house that fit the color scheme and might work on a photo wall: random picture frames and trinkets we were either using elsewhere or not using at all.
I put them on the floor right in front of the couch so I'd have an idea of the scale and then proceeded to move them around for a few days. Laying everything out allowed me to change things up, add items and even photograph the layout before making any final decisions.
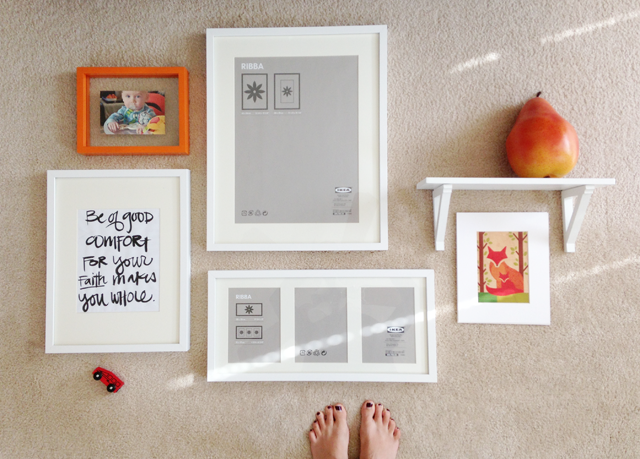
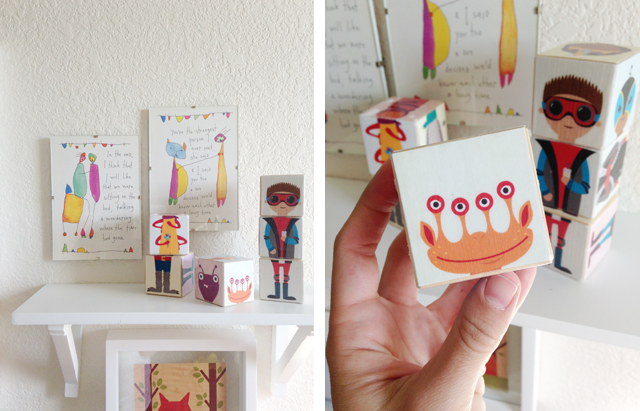
We already owned most of what wound up on the wall. I bought this little white shelf on clearance at Target several years ago, but I'd actually never hung it up (am I the only one who does this?). The prints are from Brian Andreas.
They were a gift from some college friends, so I've had them for twelve years. I can't believe that! I also can't believe that they're still intact after a million moves and I still adore them.
My dear friend Erin made the little monster and super hero blocks for Ben using these printables from Caravan Shoppe. I love them and I love that they're handmade.

I found the little fox artwork at a gift shop down in San Diego last year. It's printed on maple veneer and floating in a frame I bought on sale at Target ages ago. You can find the fox print HERE.

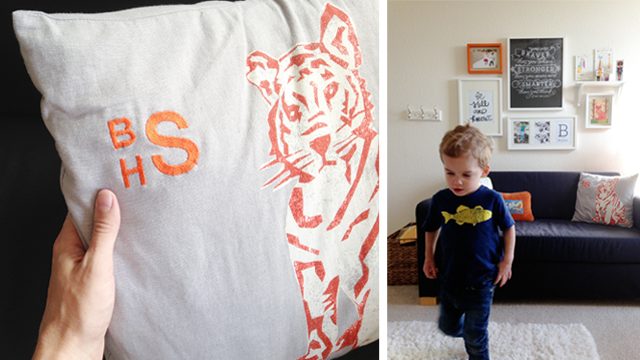
One of the new splurges for the room is the grey and orange tiger pillow from Pottery Barn Kids. I had it monogrammed at the store in Palo Alto and although it was a bit pricey for a pillow sham, I seriously love it.
The "b" pillow is from Serena & Lily. It lived on the glider in the nursery but it definitely belonged in Ben's new room. As soon as I decided to use orange in the room, I knew I'd use the little "Sail" pillow.
One of my aunts handmade it for my parents in the late 1970s. I think it's needlepoint (I don't know much about this kind of stuff). It has the name of their sailboat on it, the Pony Express, and for some reason I've always liked it.

The hooks and the small orange and white frames are all from Target (years ago). The orange clothes tree is by P'kolino (and it's on SALE!). The large white frames are from Ikea.
You can download the chalk art for FREE at Caravan Shoppe. And the hand-lettered artwork was painted by me!
This project started as a big, blank wall, which was pretty daunting. It helped to break it down by beginning with a basic color scheme and building from there. My favorite part of the project was giving new life to things we already owned and loved. It's now one of my favorite spots in the house.